Monday, December 12, 2011

A Good Morning Start

Most of you are busy bee's like myself. Especially around Christmas time, the average hustle and bustle expands times a thousand! Making an wholesome balanced breakfast becomes way too time consuming, leading my desire for convenient fast good growing.  Undoubtedly,  you waist line gets bigger and your pockets slimmer. It's a horrible cycle America! So, this week, I vow to break that cycle by creating easy, healthy and accessible morning foods, that will not only keep me satisfied but alleviating the guilt I always get with my current routine of a caramel latte and lemon loaf from Starbucks (Don't judge me). 

This morning I adapted a recipe from Allrecipes.com called Seminary Muffins.  Seminary Muffins? Sounds kind of dry and boring right? Well, these muffins are nothing of the sort. Replacing white flour for whole wheat, these muffins are healthier and the ripe banana and applesauce makes theme killer moist. They also freeze very well. I got 14 regular size muffins out the recipe, and decided to freeze half of them. When ready to eat, just pop them in the microwave for 30 seconds and your ready to go. Today I paired a muffin with half an orange and green tea. I feel lighter already. Enjoy! 

Seminary Muffins

  • Ingredients 

  • 1 egg
  • 1 1/3 cups mashed ripe banana
  • 3/4 cup packed brown sugar
  • 1/3 cup applesauce
  • 1 teaspoon vanilla extract
  • 1 cup whole wheat flour
  • 1/2 teaspoon baking soda
  • 2 teaspoons baking powder
  • 1 1/4 teaspoons salt
  • 1 teaspoon ground cinnamon
  • 1 cup quick cooking oats
  • 1/2 cup chopped walnuts or pecans

Directions

  1. Preheat oven to 350 degrees F (175 degrees C). Lightly grease one 12 cup muffin pan.
  2. In a large bowl, combine egg, banana, brown sugar, applesauce and vanilla. In a separate bowl, sift together flour, baking soda, baking powder, salt and cinnamon.
  3. Gently stir flour mixture and oatmeal into banana mixture. Fold in walnuts. Pour batter into prepared muffin cups.
  4. Bake in preheated oven or 15 to 20 minutes, or until light brown. Remove muffins from pan and place on a wire rack to let cool before serving.

Monday, November 28, 2011

"Leftover" Turkey Pot Pie


After a wonderful Thanksgiving holiday, I couldn't bring myself to utter the word pie considering all that I ate over the weekend.  Truly sinful. But I had plenty of turkey left, and it was obvious to me to make a Turkey Pot Pie. Pot Pie is one of those "all in one" dishes that is such a comfort food for the winter. This recipe is super simple and takes no time to prepare.The original recipe calls for milk, but my husband is lactose and to cut down on the fat I left it out. I often make chicken pot pie with cream of chicken, and in my opinion it taste better with out it. My husband even says it taste "healthier". My mother in law left over some ready made crust at my house, and although I cringed for the moment at the thought of using store bought crust for this pie, but when your in the a time crunch, who cares! I still encourage everyone to try and make their own crust, but when you have a hungry husband, or kids, store bought crust get's the job done. Enjoy. 


Ingredients: 


1 recipe pastry for a (10 inch) double crust pie
4 tablespoons butter
1 small onion, minced
2 stalks celery, chopped
2 carrots, diced
2 tablespoon Italian Seasoning
1 teaspoon Poultry Seasoning
salt and pepper to taste
2 cubes chicken bouillon
1 cup of water
1 cup of chicken broth 
2 medium size potato, peeled and cubed
1 1/2 cups cooked turkey, cubed
1/3 cup all-purpose flour 


Directions: 
  1. Preheat oven to 425 degrees F (220 degrees C). Roll out bottom pie crust and place in the 10 inch pie pan (I only had a 9" on hand and it worked fine). Set pie inside the freezer until ready to use. 
  2. Place 2 tablespoons of the butter in a large skillet. Add all veggies, parsley, oregano, salt and pepper. Cook and stir until the vegetable are soft. Stir in the bouillon with the water and 1/2 cup of chicken stock. Bring mixture to a boil. Stir in the potatoes, and cook until tender but still firm. 
  3. In a medium bowl, take 1/3 cup of flour and whisk in the other 1/2 of chicken stock until smooth. Stir in the flour mixture until fully incorporated. Stir the chopped turkey into the vegetable mixture, and cook until thickened. Use more chicken stock into the mixture if too thick. You want the pie to have enough sauce and not be dry. 
  4. While filling is cooking, place frozen pie shell in the oven and blind bake it for 10 minutes (See note below)
  5. Once filling is done, pour mixture into the partially baked pie shell. Roll out the top crust, and place on top of filling. Flute edges,and make 4 slits in the top crust to let out steam
  6. Bake in the preheated oven for 15 minutes. Reduce oven temperature to 350 degrees F (175 degrees C) and continue baking for 20 minutes, or until crust is golden brown. 
Note: Blind bake helps the crust from not getting soggy from pie filling. I use this method for all fruit pies and quiches. Give you a nice bottom crust every time. Click this link to get instructions on how to. 

Wednesday, November 16, 2011

The Worthen's Thanksgiving 2011

I hope everyone had a wonderful, gut busting Thanksgiving with family and friends.  I know I sure did. I tried some new recipes this year. Some successful, and some not so much. I even got inspired to try some crafting. Overall it was a wonderful Thanksgiving.


Baking, crafts, DIY projects, beauty and shopping is what I love! This Thanksgiving I thankfully found time to do it all . Last year I wanted to do a fall reef, bought all the necessary items to make one and I never did it. This year I was determined to put up my reef, but was inspired into another direction. Taking notes from Craftaholics Anonymous I made my fall reef out of burlap, which by the way is a very messy sometimes difficult fabric to work with. But I got great tips from Linda, the creator of Craftaholics and the final project came out great. 


Fall is my favorite season of the year. I walk out of my home and am in awe of natures beauty. Once green fruitful trees, turn to shades of red, yellows and browns dressing the streets and pave ways. Ever want to jump or dive into a big pile of autumn leaves. I have, but most likely never will, because I'm afraid of bugs getting in my hair...Anyways, I used the pictures I took around my neighborhood as creative inspiration for my Brown Sugar cookies and Carrot Cake cupcakes


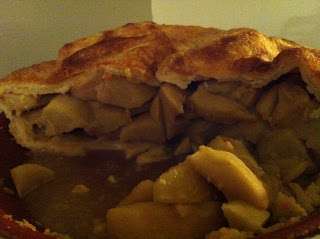
Desserts I made this Thanksgiving is of course my tasty Apple Pie. I absolutely love this pie. Tart green apples with a caramelized sauce inside. The best part is the homemade buttery crust. I could just eat the crust by itself. 


Classic Pound Cake. I got this recipe from Brown Eyed Baker. Great cake, except I forgot the vanilla. It came out a bit bland for me so I spiced it up with a brown butter glaze on top. It gave the cake the perfect amount of sweetness. Yum.


The final dessert I made for the night was a double layer pumpkin cheese cake. It was soooo delicious, but you know what, no one else ate it but me! I couldn't believe it. I believe my family is so used to eating more traditional soul food, that they were slightly intimidated, possible even put off by a pumpkin dessert. I won't speak for all African American households, but I don't know many black people that grew up eating pumpkin pie for the holiday. I know my family didn't, and the pumpkin pies I tasted just weren't good. But as a baker I ventured into trying different pumpkin recipes and have had some great success. That's okay. I will convert them one at a time.  


 The grand finally of the night was of course was the turkey. I've made the turkey for the past two years and was asked to make it again. I use a brine recipe that works every time. Juicy and flavorful.
Hopefully, I'll have a turkey tutorial ready before Christmas. 


Below is the man of the household cutting the bird. My hubby is a natural. Now it's time to bust open the Christmas lights!


Happy Bundt Day!

Apple Cake with Caramel Sauce 

Yesterday was Nordic Ware's National Bundt Day. If you're not familiar with Nordic Ware, they make high quality bake ware and with really interesting designs. You can always count on major department stores like Target or Walmart carrying their designs during the holidays. I bought this pumpkin cake pan three weeks ago and can't wait to use it. 
They even have more intricate pans as well like this turkey pan. Can you imagine a turkey cake for Thanksgiving? Too cute! 

Today I decided to use my classic bundt pan, and try a new apple cake recipe. Going along with the "Apple a Day" theme this month, this cake recipe fit right in. I altered the recipe a bit to fit what I had on hand. I also omitted using oil all together, and replaced it with apple butter (recipe coming soon). The cake came out beautifully. Dense, super moist, with bits of sweet apples and nuts. This cake is pretty good on it's own, but in my opinion don't omit the caramel sauce! I couldn't stop licking my fingers as the sauce oozed down the cake board. The recipe does make more sauce than you need. When the cake is still warm, punch holes in the cake with a wooden skewer. Pour 1/3 of the sauce over the cake allowing the cake to adsorb it. Save the remaining sauce for when you serve the cake and for presentation. With the nights getting colder, this cake with a cup of coffee or tea will hit the spot, guaranteed. 


Adapted from allrecipes.com

INGREDIENTS : 
  • 3 eggs
  • 1 cup of sugar
  • 1 cup of brown sugar
  • 1 1/2 cups Apple butter (if you don't have apple butter, apple sauce can be used) 
  • 2 teaspoons vanilla extract
  • 3 cups all-purpose flour
  • 1 teaspoon salt
  • 1 teaspoon baking soda
  • 4 cups chopped, peeled apples
  • 1 cup coarsely chopped pecans or walnut.(I used a mix of both) 

  • TOPPING:
  • 1/2 cup butter or margarine
  • 1/4 heavy cream (you can substitute for milk) 
  • 1 cup packed brown sugar
  • Pinch salt

DIRECTIONS:


  1. In a mixing bowl, beat eggs until foamy; gradually add both sugars. Blend in apple butter or apple sauce and vanilla. Combine flour, salt and baking soda; add to egg mixture. Stir in apples and nuts. Pour into a greased 10-in. tube pan; bake at 350 degrees F for 1 hour and 15 minutes or until the cake tests done. Cool in pan on a wire rack for 10 minutes. Remove cake to a serving platter.
  2. For topping, combine all ingredients in a saucepan; boil 3 minutes, stirring constantly. Slowly pour over warm cake (some topping will run down onto the serving plate.)

Tuesday, November 8, 2011

An Apple A Day...

November is the officially APPLE month for me. I love apples, and I love creating delicious treats with apples. The holidays are here, and it's the best time to get all kind of apples for cheap. One day, when my hubby and I finally get a house, the first thing I do will be to plant an apple tree. Do apple trees grow well in Sacramento? 


My favorite recipe to make, using apples,  is my Caramel Apple Cheesecake. Sorry guys no recipe shared on this one. I'm keeping this baby sealed and tight. Using the inspirations of three different recipes and I came up with my version and it hasn't failed me yet. I even one the first annual church bake off at Elk Grove Bible Church. I won a beautiful leather bonded John MacArthur bible. If you are looking for a good bible, get the John MacArthur ESV study bible. It's fantastic.


I had some left over apple filling from the Apple Caramel Cheesecake and I made earlier this week, and  I sure didn't want it to go to waste so I thought about making some apple muffins. My husband and I, well more my husband, tries to stay away from while flour and sugar, so I tried to find online healthy apple muffin recipes and was bombarded with different variations of  recipes all sounding very scrumptious to make.
But, one in particular caught my apple, Smitten Kitchens Whole Wheat Apple Muffins. 1. Because the pictures of these muffins on the website were so inciting. 2. The recipe was healthier than any of the other recipes I looked at and  3. I notice many other websites and bloggers used the recipe as a base to create their own apple muffins. So, I figure this muffin must be a winner!

And boy was I right. These muffins are so unbelievably moist, really it's almost like eating cake, and that surprised me when using whole wheat flour. Whole wheat get's such a bad rap, but when you use it right it can be an awesome substitution for white flour.
A couple of changes I did decide to make was to substitute white sugar for splenda. I may of not even needed the splenda considering the sauteed apples were already sweetened with sugar. Also instead of 1/4 of the brown sugar sprinkled on top, I put the whole 1/2 cup of brown sugar in the batter. That was actually a mistake. Didn't read the directions carefully, but it worked.

If you have any extra apples that you need to get rid of, this recipe is a must! Click on the title for the recipe.

I'm not as healthy as my other half, so I smothered mine in butter. I'm so bad.

My 1st Baby Shower Cake


I just want to say that I'm so blessed to have the opportunities to make yummy sweets for my family and friends, and people who were referred to me. I get the opportunity to experiment, and create delicious things and although it can be challenging, being able to gain the experience is so rewarding. 

This past week I got to chance to make a baby shower cake, cupcakes and cake pops for a mother to be. The Mom to Be's sister really wanted to do something special, but I only had a week to get it together,  so I let the client choose between four different style of cakes that I confidently knew I could create in time and here is what we came up with! 


I made two dozen strawberry shortcake cupcakes with mock whip cream topping and gum paste decorative topper. They were very time consuming, and tedious but so worth it. I fortunately had the help of my "baking assistant" Jasmine. She's a high school student that I mentor through Young Life and she has taken interest in baking. So every now and then, when she has time, she helps me out tremendously.


This was originally what I had planned to go on top of the six inch, three layered Strawberry Shortcake cake. I got the idea from a fantastic tutorial from My Cake School.  Doesn't she look so cute?! I hadn't planned on her to lean to the side so much, but sometimes mistakes make the perfect result...well actually this is not one of those times. For some reason the top half of my girl would not adhere to the bottom half. Both were pretty firm. I didn't have time to make another, so I improvised. 


I took away the legs and just made her have a dress. I think she still looks really cute, but I want to try this topper again including the legs. I know I can make it work. Next to her, I put an ice cream jar, pickle jar and baby books. Something I also got from My Cake School. 


Here is mommy to be, being silly next to the cake.
I also made the cupcake stand, and it was supper easy to make. Tutorial on that soon. 

So, notice the cupcake toppers are slowly sliding off the cupcakes in this picture?  Not happy with that. Apparently, gum paste toppers, once hard, can't withstand being in the refrigerator or whipped cream. The toppers totally got soft again, bled and were trying to slide off the cupcakes! I've decorated with toppers before using buttercream and putting them in the fridge and I didn't have a problem with it. So,  I'm lead to believe it was the whipped cream .Oh well, I'll now for next time. 
Overall I'm extremely pleased with the results and I hope to have the opportunity to do a baby shower again. Maybe my own one day...hee hee. 

Monday, October 31, 2011

Happy Halloween!

Last year I baked nothing for Halloween, and seriously regretted  it after looking at all the creative postings on my favorite blog sites. So, this year I wanted to step my game up and showcase some of the recipes I want to try for the fall. Starting with one of my favorite holidays, Halloween. Halloween is such a magical night full of anticipation of being someone other than yourself, eating sweets until you get that sugar high, and my highlight is to watch my little cousin dress up. They are so freaken cute! When I finally have my little butterball of cuteness I'm so going all out.


It was a lot of fun trying the many new recipes and design techniques, but boy was it stressful. My plan was to have the recipes posted for you all to try yourself before Halloween. But with my husband and I new work schedule and the many thousand other things I do, it was just too hard. So, this posting will be mainly on what recipes I tried and how they came out, not really tutorials. Sorry guys, I'm getting better with the blog thing. I will still post the recipes I used because many of the recipes can certainly be used for other occasions. Check them out and I hope you like! Happy Halloween

Ghostly Pumpkin Spice Cake


How can you not smile when you see this cute little ghost. I got the idea from My Cake School blog. As soon as I saw it I had to make it, and it was super easy too. Just took an hour or so to put together the ghost and I let it sit over night. The head is made out of rice crispy treats, and fortunately I was able to snag a pack of crispy treats from the Dollar Store (score), and the marhmellow pumpkins decorated on the side of the cake were on sale at Walgreens for less than a dollar.  If you are looking the most moist, delicious, easy to make pumpkin cake, you have to try this recipe from Baked Profession. My goodness is this cake awesome. I couldn't stop nibbling on the cut off pieces. I even got my husband sampling and he hates pumpkin anything. The Cinnamon cream cheese frosting is ridiculously tasty. I really can't say enough about this cake. I will defiantly make it during thanksgiving. 


After trimming the cake down, I did have quit a bit of cake scraps left over, so I attempted to make some cake pops out of it. Well, so some reason the cake was having a hard time staying on the lolly pops. Too moist maybe? No worries, pumpkin spice cake balls it is!


Pumpkin Spice Cake #2 

So the reason I'm posting this recipe, is for you readers out there that don't have the time to deal with  browning butter or shifting dry ingredients. This recipe uses a yellow cake box mix, pumpkin puree and spices. It was a little odd that the recipe called for double the amount of the eggs the more "homemade"cake called for, but hey whatever works. Is it better tasting than the cake recipe above, heck no! It just doesn't have the rich flavor that the recipe above has. But, it's a pretty good runner up, and if you are able to slap on that finger licking cinnamon icing on top, you got a winner. 

I got the piping detail idea from Baked Perfection. Isn't is  lovely.
And it's awesome how you can see the vanilla bean in the frosting. 
Last minute detail, I added homemade caramel to jazz it up. 


Halloween Candy Bark

https://blogger.googleusercontent.com/img/b/R29vZ2xl/AVvXsEgPesQkKWgejGPgu22tdQYAqqHdH0_sHcRLpPiHOlqeKvV2qdgYDJpyCOzG4uhkAcguRPornhD1oi3xeGury_wgZkG5v8wrowrANTPkw6eVNbaHZnwwjr41ZdEiCXfWCvYB4x4Bq3L0pmA/s400/Candy+Bark.JPG
Adapted from Bon Appetit

This double chocolate, peanut buttery concoction is just amazing! Don't bother giving kids candy for Halloween. Bless them with this treat, and your golden. I made a batch right before my Young Life Club and they kids devoured it, and was asking me when was I going to make more.  
Here is an idea; If you do decided to go trick or treating with the kids, consider saving half of the candy they get to make the bark. The recipe is so versatile you can really cater to whatever occasion or candy you like. Christmas is around the corner and this candy bark would go great is holiday baskets. 

Ingredients:
  • 1 lbs bittersweet chocolate chips (I used 60% Ghirardelli chocolate) 
  • 1 lbs of milk chocolate chips
  • 3 2.1-ounce Butterfinger candy bars, cut into irregular 1-inch pieces
  • 1/2 cup of Heath toffee chips 
  • 8 0.55-ounce peanut butter cups, each cut into 8 wedges
  • 1/4 cup honey roasted peanut
  • 3 ounces of white chocolate (I used Ghiraradelli's)
  • Yellow and Orange peanut M&M's, chopped (You could use red and green for Christmas)
Directions:
  • Line baking sheet with parchment paper or wax paper. Put bitter sweet chocolate chips in microwave safe bowl. Heat just until melted, make sure not to over heat and burn chocolate.  Pour chocolate onto parchment paper; spread to 1/4-inch thickness (about 12x10-inch rectangle). Heat milk chocolate the same. Spread on top of the bittersweet chocolate. Take a utensil and swirl chocolate together. 
  • Sprinkle with Butterfinger candy, toffee, Reese's peanut butter cups, and nuts, making sure all pieces touch melted chocolate to adhere.
  • Put white chocolate in microwave safe bowl. Heat the chocolate like you did the above. Dip spoon into chocolate; wave from side to side over bark, creating zigzag lines. Scatter chopped M&M's over making sure candy touches melted chocolate.
  • Chill bark until firm, 30 minutes. Slide parchment with candy onto work surface; peel off parchment. Cut bark into irregular pieces.